There’s something irresistibly nostalgic about those bright, chewy coconut treats that bring back memories of family gatherings, colorful Easter baskets, and warm spring afternoons. Easter Bunny Coconut Tails have a way of transporting you to simpler times when the kitchen was filled with laughter and the sweet scent of coconut drifted through the air. These little bites are not only charming with their pastel hues but also super easy to whip up—making them perfect for a last-minute Easter dessert or a festive gift that’s sure to delight everyone.
I remember the first time I made these with my kids; their eyes lit up as they rolled the coconut balls in the extra flakes, each choosing a different color to dye their batch. The best part? No baking required! If you’re short on time but want to bring a homemade touch to your Easter celebration, these Easter Bunny Coconut Tails are a fantastic choice.
Why You’ll Love Easter Bunny Coconut Tails
- Fast: Ready in under 30 minutes, plus chilling time.
- Easy: No baking or fancy equipment needed—just mix, color, and roll!
- Giftable: Wrap them up in cute boxes or cellophane bags for charming Easter gifts.
- Crowd-pleasing: The soft, sweet coconut flavor wins over kids and adults alike.
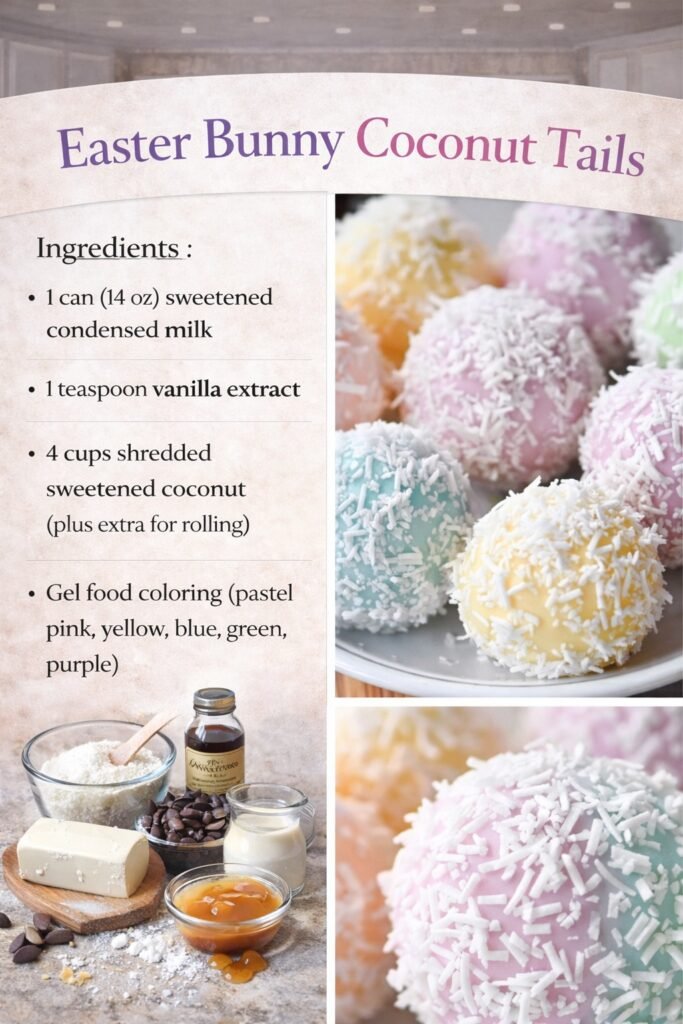
Ingredients
Let’s talk ingredients—simple, straightforward, and pantry-friendly. You probably already have most of these on hand, which makes this recipe even more appealing for spontaneous holiday baking.
- 1 can (14 oz) sweetened condensed milk: This is the magic binder that sweetens and holds everything together. Its creamy texture ensures your coconut tails are moist and chewy.
- 1 teaspoon vanilla extract: A splash of vanilla adds warmth and depth to the flavor, making these treats taste like a little piece of heaven.
- 4 cups shredded sweetened coconut (plus extra for rolling): This is what gives the tails their signature coconutty chew and texture. Sweetened coconut works best to balance the condensed milk’s richness.
- Gel food coloring: Pastel shades like pink, yellow, blue, green, and purple bring these treats to life with a festive Easter vibe. Gel colors are preferred because they don’t add extra moisture, keeping the mixture just right.
How to Make Easter Bunny Coconut Tails
Here’s where the fun begins! This recipe is as much about enjoying the process as it is about the delicious results. I love that you can get the kids involved with the colorful mixing and rolling steps—just be prepared for some sticky fingers and lots of smiles.
- Combine the sweetened condensed milk and vanilla extract: In a large mixing bowl, pour in the entire can of sweetened condensed milk. Add the teaspoon of vanilla extract and stir gently until the vanilla is evenly incorporated. This creates a smooth, creamy base for your coconut.
- Add the shredded coconut gradually: Slowly fold in the 4 cups of shredded sweetened coconut. Stir as you go to coat every flake in the sweetened condensed milk mixture. You want the mixture to be moist but firm enough to hold its shape when rolled. If it feels too wet, add a tiny bit more coconut.
- Divide the mixture: Separate your coconut mixture into 4 or 5 equal portions, depending on how many colors you want to create. This is where the recipe becomes a little art project!
- Add gel food coloring: Drop a few drops of your chosen pastel gel food coloring into each portion. Use a spoon or your hands (wear gloves if you want to stay tidy) to knead the color evenly throughout the coconut mixture. The vibrant pastel hues give these treats their signature Easter charm.
- Roll into balls: Pinch off small amounts of the colored coconut mixture and roll them between your palms to form 1-inch balls. Don’t worry if they aren’t perfect—rustic shapes add to the homemade feel!
- Coat with extra coconut: Pour some extra shredded coconut onto a plate or shallow bowl. Roll each colored ball in the coconut flakes, making sure each one is fully coated. This step adds a lovely texture and gives your tails that snowy, fluffy look.
- Chill to set: Line a baking sheet or tray with parchment paper and place your coated coconut tails on it. Refrigerate for at least 1 hour, allowing the mixture to firm up. This helps them hold their shape and makes them easier to handle when serving.
- Serve and enjoy: These little beauties can be served chilled straight from the fridge or brought to room temperature for a softer bite. They’re perfect on their own or alongside other Easter goodies like a classic carrot cake, which you can try making with my favorite recipe for The Ultimate Classic Carrot Cake Perfect for Any Occasion.
Substitutions & Additions
The beauty of Easter Bunny Coconut Tails is how adaptable they are. While the original recipe is delightful, you can put your own spin on it depending on what you have or want to try. Here are some ideas to inspire your creativity:
- Use unsweetened coconut: If you prefer a less sweet treat, swap the sweetened shredded coconut for unsweetened. You might want to add a bit more sweetened condensed milk or a touch of honey to balance.
- Flavor twists: Add a teaspoon of almond extract or coconut rum extract to the vanilla for a new depth of flavor. It’s subtle but lovely!
- Nutty crunch: Mix in finely chopped toasted almonds, pecans, or macadamia nuts for a little texture surprise inside the tails.
- Chocolate dip: After chilling, dip half of each coconut ball in melted white or dark chocolate and let them set again. This adds a decadent layer of flavor and a beautiful finish.
- Sprinkles or edible glitter: For extra festive fun, roll the balls in pastel sprinkles or edible glitter instead of coconut—or do a mix of both!
- Color variations: Don’t limit yourself to pastels! Bright spring colors or even natural colorings like beet juice for pink or matcha powder for green can make these treats uniquely yours.
Tips for Success
Making Easter Bunny Coconut Tails is pretty straightforward, but a couple of key tips from my kitchen can help you nail the perfect texture and appearance every time. Here’s what I’ve learned over the years:
- Don’t skip chilling: Allowing the coconut balls to chill for at least an hour is crucial. It helps them firm up so they don’t fall apart when handled or served.
- Use gel food coloring: Liquid food coloring can make the mixture too wet, so gel colors are the way to go for vibrant colors without affecting texture.
- Keep your hands slightly damp: If the mixture sticks too much while rolling, wet your hands with cold water. This helps in shaping the balls smoothly without losing their form.
- Line your trays: Use parchment paper or a silicone mat to prevent sticking during chilling—makes cleanup easier too.
- Prep ahead: You can make these a day or two in advance. Just keep them covered in the fridge to maintain freshness and color vibrancy.
- Customize your bowl: For a fun twist, try mixing in mini chocolate chips or dried fruit pieces to add little bursts of flavor. It’s a nice surprise in every bite!
How to Store Easter Bunny Coconut Tails
One of the best things about these coconut tails is how well they keep. Because of the sweetened condensed milk and coconut, they stay moist and delicious for quite a while. Here’s how I store mine to keep them fresh and picture-perfect:
- Refrigerate: Store the coconut tails in an airtight container lined with parchment paper. They will keep beautifully in the fridge for up to one week.
- Freeze: If you want to make them well ahead of time, these freeze wonderfully. Place them in a single layer on a baking sheet to freeze solid, then transfer to a freezer-safe container or bag. They’ll keep for up to 2 months. Thaw in the fridge before serving.
- Room temperature: You can keep them out at room temperature for a day or two if you’re serving at a party or gathering. Just keep them covered to prevent drying out.
FAQs
Can I use fresh coconut instead of shredded?
Fresh grated coconut can work, but it has a higher moisture content, which might make the mixture too wet and sticky. If you want to try it, add less condensed milk and chill the mixture longer to help firm it up.
Are these safe for kids to make?
Absolutely! This no-bake recipe is perfect for little hands to help with mixing, coloring, and rolling. Just be prepared for some sticky fun in the kitchen.
Can I make these vegan or dairy-free?
You can substitute sweetened condensed milk with a vegan alternative, like sweetened coconut condensed milk or a homemade cashew cream. The texture might differ slightly, but it’s a great option for dairy-free diets.
What’s the best way to get the pastel colors right?
Start with just a drop or two of gel food coloring and mix well. You can always add more for a deeper color. Remember, pastel shades are softer, so less is more!
For more festive treats that bring a splash of color and fun to your kitchen, you might also enjoy trying my recipe for Nostalgic Rice Krispies Chocolate Chip Cookies, which pairs wonderfully with these coconut tails for an Easter dessert table that’s sure to impress.
If you’re looking to add a bright and zesty breakfast to your spring mornings, my Fluffy Lemon Ricotta Pancakes are a refreshing complement to these sweet coconut treats, bringing sunshine to your table and smiles to your family’s faces.
Whether you’re prepping for an Easter party, looking for a cute homemade gift, or simply craving a sweet, chewy treat, these Easter Bunny Coconut Tails are a delicious and delightful choice. They’re easy enough to make on a whim but special enough to feel like a celebration in every bite. So gather your ingredients, pick your favorite colors, and get ready to create some Easter magic in your kitchen!